myfreecopyright.com registered & protected

Tuesday 14 December 2010

snowy card with glitter

i know that snowy cards are generally blues and crystally white but hey i fancied a change.  This paper is heidi grace and the chipboards are k and co but i blinged them upa bit with stickles and pearlidoodles.  I used a simple 5 inch square white card folded into an easel.  i think it is simple but effective and it is another christmas card ready to send so job done!

Friday 1 October 2010

Faux Pearls using white glue

Hello I have a few comments about the faux pearls and the way they look so I thought id say a bit more.  I have tried these faux pearls quite a few times and to be honest they take a bit of practice.  I suppose it is likeworking with pearlidoodles or stickles you get a feel after a bit.  On the blooms card my pearlidoodles got smudged and i added a bit more which i think made it look messy.
The faux pearls I tried straight out of the bottle but they were too big and too flat.  I now use a tiny pipette which i bought in our local craft shop.  It is like a sort of eye dropper and i mixed the mica with the glue before i made the pearl the last time which makes it look a bit more intense colour.  when they were almost dried i played with the shape a bit and have made some that are a bit more ovalish not sure what ill use that shape for but i like playing.  When the glue dries they settle into a nice shape.

Anyway try the pipette for the faux pearls and then mess around with the mica in the glue as well although you need to use all the pipette to save waste and to save the pipette getting clogged up.

Have a good day, happy crafting.

Tuesday 28 September 2010

flowers for a hospital gift

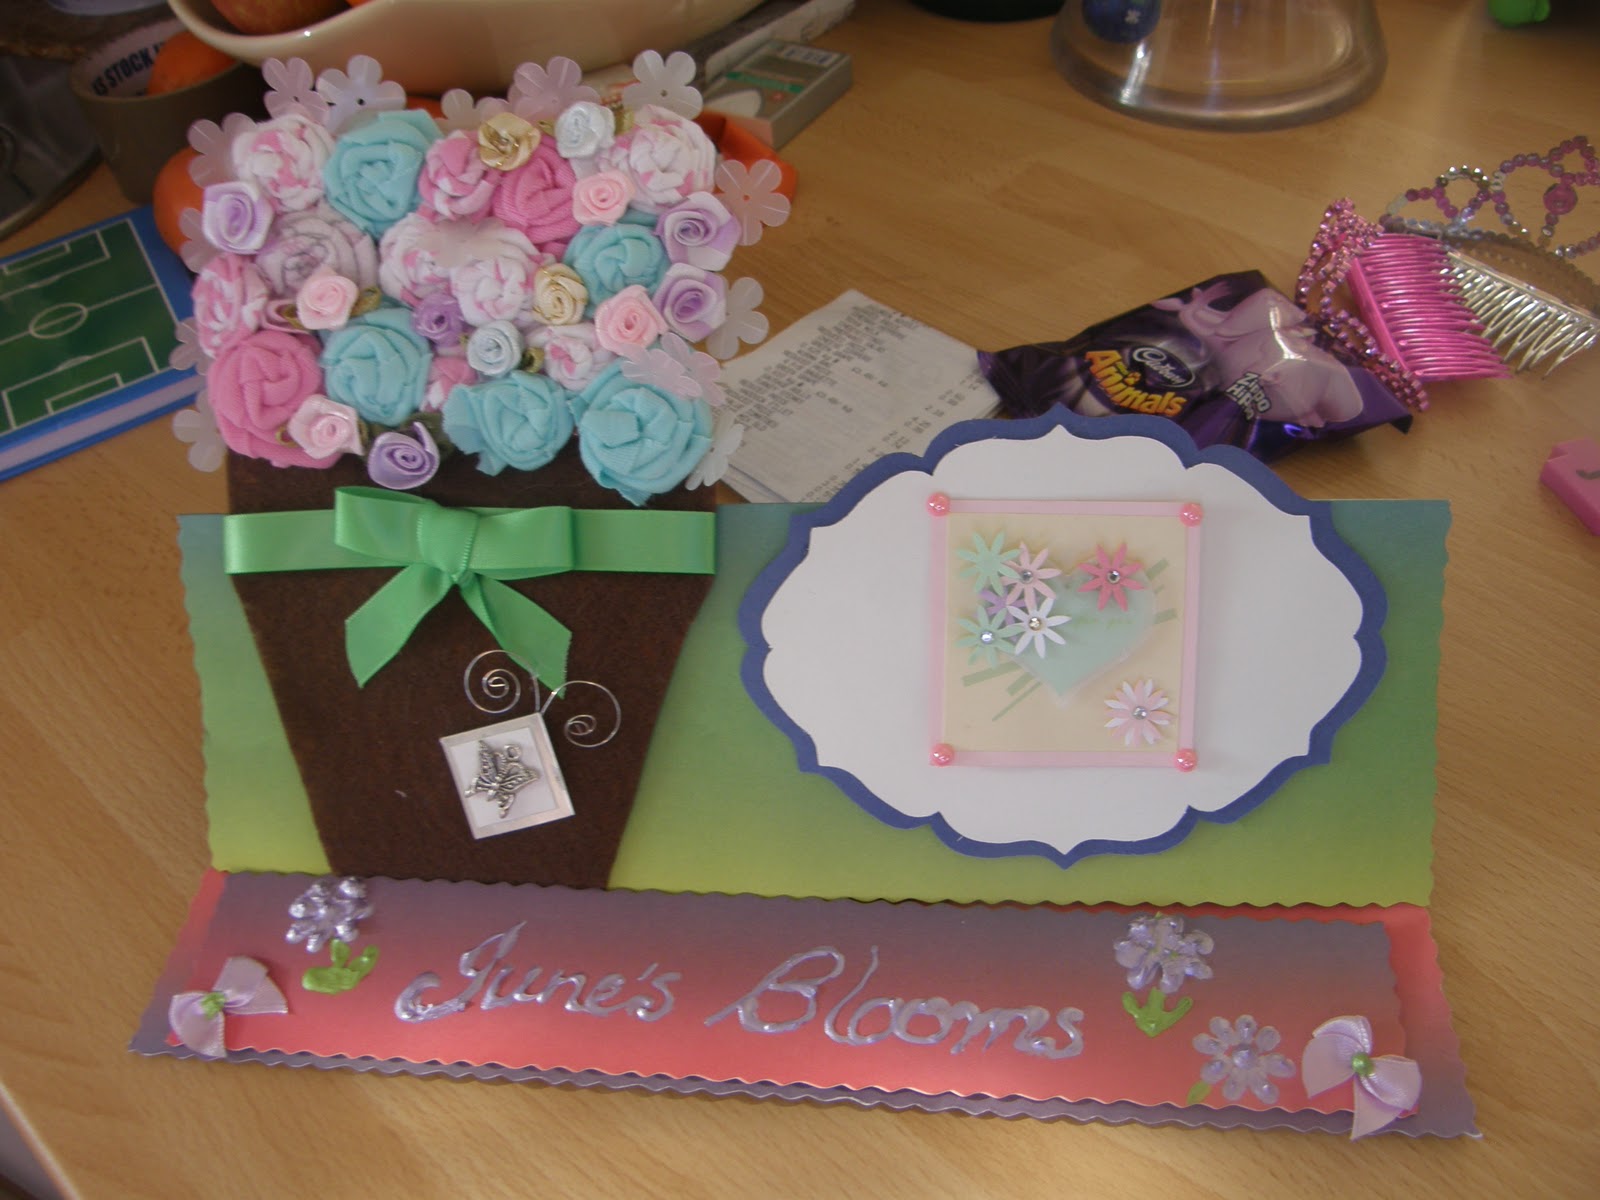
Hi there all.  I thought Id make a little flower gift for my friend June who is in hospital.  June loves her garden and her flowers but the hospitals no longer allow fresh flowers or plants to be brought into wards.  So I thought what is the next best thing well try and recreate a plant pot or flower pot with some blooms to brighten her time there.  Her name is June as well so I thought ok lets go with 'Junes blooms'.
Junes son David and his business partner Paul inspire me with their cake making skills and the roses they wind out of icing, (http://www.designer-cakes.com/)  Hence,I made all the ribbon roses for the wedding in July past.
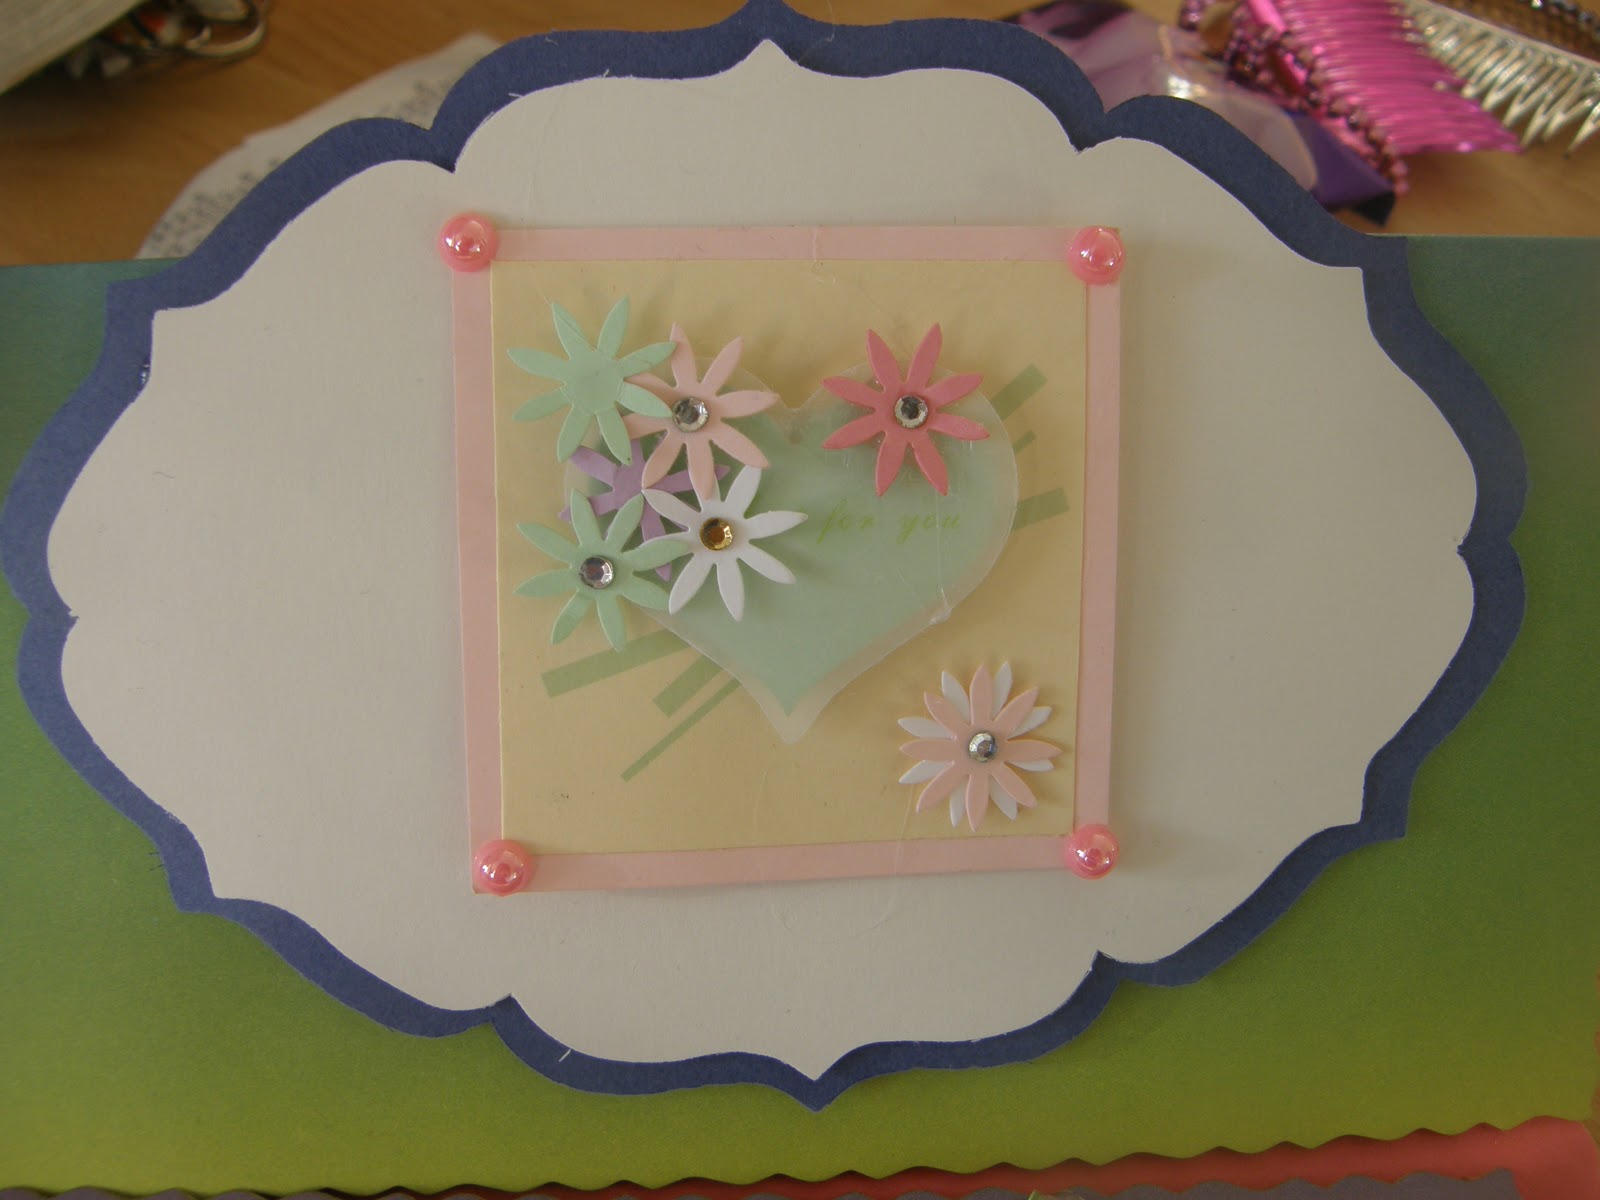
SO I took it one step further and made a card with fabric roses and a felt pot.  Then tried to 3d it a bit by adding vellum flowers punched out too.
Here is what I ended up with ....i made it larger than normal as it had to sit on the table at the end of the bed to accomodate her other more necessary items on her side table.

 Made in the style of an easel card
 Closer view of the fabric wound roses
 Nestabilities used to create two layers for a little heart saying 'just for you'
 Took me ages to get the bow just right so it sat straight.  I really should invest in a glitter girls bow shaper, hey santa are you listening??  Or at very least my super handy hubby could make me a little wooden block with some dowels and spaced holes for different sized bows eh Johnny are you listening?
 Pearlidoodles to create shiny flowers and write junes blooms although shoogly hand doesnt help!

 Gave up trying to tie two tiny bows and cheated a bit. I folded ribbon till it sat the way i wanted it too and i put two tiny tack stitches in them to hold them there then glued them on with pinflair glue
 voila
 i went back to my decoupage cds box to find a card to make that i could write in
 I printed the loops on using white cardstock 300gsm and then burned them out using the chizzelit from provocraft. it is kinda like a dremel tool but in a prettier colour and made for crafters :o).
Then i printed a watering can and flowers three times on one sheet of lightweight decoupage paper which is quite glossy. I printed the verse from a book of quotes of anna griffins but i didnt want it on vellum so i printed it on pc.  I placed a singlepiece of ribbon behind verse and folded it back on itself to look like a tag.
I layered up the watering can and added a few paper punched flowers which I soaked first and scrunched up to make them more dimensional.
Finally I added stickles and two little beads which are a bit of a cheat as well.  I used a sheet of acetate and dropped little drops of white glue on to it.  I lef it overnight to dry and hey ho they look like pearls when they are dry.  You can spray them with mica to change the colour if you want but i just left them white here.  The last thing was to ensure there was enough stickles on the card :oP  I LOVE STICKLES!

Oh and a little confession the white glue into beads wasnt an original idea by me, much as I wish it was :o(.
The idea came from Sue from creative expressions USA, so thanks Sue for your cheaper shortcuts, i love it when we can find a shortcut to create some beautiful embellishments and dont have to pay the premium price for a tiny handful of them.

it is always a good idea to actually post the pics too haha!

Wednesday 22 September 2010

always handy when you add the pics of the things you are posting about.....mmmm

I made two identical bookmarks for the two sisters who ordered it to write a personal message to the bride and groomThen this is the wedding mini scrap book
The book itself is cut using cricut expression wild card cartridge and a sheet of grey board chipboard blank.  Then punched using big bite cropo dile 2 and joined together using two inch and a half jump rings.

Mini scrapbook wedding gift.

Hello everyone from a very bleak, damp september day in the UK.  I am doing a quick post today of a wedding minibook I was asked to make as a wedding gift.  It captures the bride and groom as babies, children, teenagers then of course as a happy couple and is a brief journey of their lives growing up together, getting together and now getting married.  They got married in Cyprus last thursday and are currently on honeymoon.  They are having a wedding celebration next month on their return from Cyprus and will be presented with this gift by their close friends who ordered it.  The brief was keep everything black and white, no colour, which I found very difficult indeed.  As you can imagine, love hearts are  red ......well usually..... and to capture truest pictures they are in colour or else you dont know which baby is the girl mmmmmm.  So i strayed a little, I made the book and embellishments monochrome but kept the inside of the photo pockets colour to add dimension.
Then I made a quickie card again according to the very strict black and white brief and well it turned out ok although nothing a bit of colour wouldnt have enhanced ...or am i being too picky?
I made a photo collage of the bride and groom and printed it on centura pearl card stock in black and white.  Overall it is what they asked for and they are happy, I guess I just see where improvements could be made but then it wasnt for me so why argue!

Saturday 28 August 2010

THE WEDDING- thank you cards x 165 oh my goodness


Hello there everyone, just a quick post to show you the thank you cards that I made over the last few days for Gill's wedding guests.  I used a photo from the big day provided by her mum whilst she was on honeymoon.  I used photoshop and Smartdraw to soften the edges, add a white and a silver border and virtually chomp two opposite corners like the original invitations.

I added a little silver stamped 'thank you' by Mary Hughes stamps and inside a 'love and hugs' from Design Objectives Ltd.

Voila and here is the finished article.  The bride was very pleased.