myfreecopyright.com registered & protected

Monday, 7 November 2011

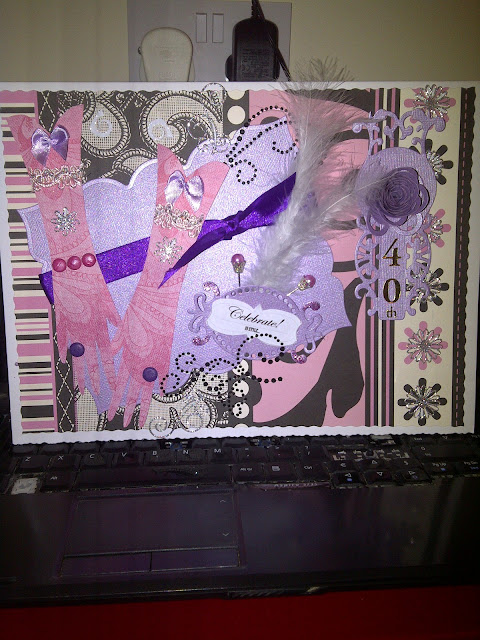
40th birthday card -an order with a clear theme

this is a birthday card which i was asked to make for a 40 year old female.  It was to be elegant and girlie and i think this card does that theme pretty much justice.  Sometimes I can stray from the girlie in favour of the grunge look and it was niceto get back to all pink n glittery.  The pearls and decorations are Sue Wilsons over at creative expressions.  The gloves are an Anna Marie Designs template and the papers are Bazill.  The rose is made using the new nesties blossom 1 die and the tags are the new nesties fancy tags 3.
Both nesties and pearls are available in my shop.  The feathers are goose biots and the ribbon I tied into bows myself using the glitter girls bow maker and simply placed a little hand stitch to keep them in place and sadly but true gave them a little iron with my mini patchwork iron to keep them flat as I didnt want too much dimension on the bows that would detract from the rest of the card.

In short I am relatively happy with the result and the person placing the order was very happy!

Job Done!

Saturday, 9 July 2011

kids birthday cards, one girl one boy

Two really simple easel cards that were made for a charity event.
I made a selection of cards, new home, birthday, anniversary and even christmas and these are two examples.


5th birthday card

A quick post to showcase this 5th birthday card for a little girl.  She loves all things pink and flowery and very girly girly.


Saturday, 12 March 2011

a wedding card for my friend

This is a card I cut using the Spellbinders grand caliber and the grand scalloped squares nestabilities.  I made the envelope from a simple sheet of a3 white artist sketch paper and decorated it.  I used the martha stewart, ribbon punch, glossy accents, lily of the valley wedded bliss stamp and a few feathers and beads to decorate.  I used the stampin up scallop oval punch to create the add on and finally a length of white organza ribbon that I just coloured with promarkers to get it the shade of the dress and roses I had already coloured.
Feedback is always appreciated. Hope you like it.


Have a great weekend.

Sunday, 20 February 2011

Venetian Mask Birthday Invitations

This time it has been a few weeks since my last post.  I have been busy making 80 birthday party invitations for my daughter whose birthday is in April.  We are having a party at the house and so I thought I best get started with the invitations before it was too late given that the party is on the school Easter holidays and folks need plenty warning :o)
I used my lovely christmas pressie from my parents.............spellbinders Caliber............an amazing piece of kit which completely stops you faffing about with adapter plates and such like when you want to use Nestabilities.  I already have a big shot original, then the express and then the pro BUT I spent more time trying to get it right with adapter plates and then cutting through the embossing mat that I more often than not gave up and did something completely different.
Now the days of faffing are gone, I use the big shot for dies and regular embossing folders, and the Caliber for nesties and marianne creatables, nellie snellen dies and for xcut and cuttlebug emboss plus slim folders.

ANYWAY the venetian mask invites............................
Debbi Moore CD which I adore, I think the ladies are so glamourous and elegant.
I let Courtenay choose her favourite mask and I played around with the size, and enhanced the colour to suit what she asked for.  Then I printed 80 of them, touched up with promarkers and added stickles and little swarovski crystals I bought and adhered them with glossy accents.
Then it took 5 days to prepare the masks and another full day cutting al of them out by hand using tiny decoupage scissors so I didnt lose any detail.
I cut 80 of the largest GRAND NESTABILITIES labels one using the caliber from gold and silver textured card stock I bought on sale at C and C between christmas and new year when they were offering postage back on purchases online. 
I cut 80 of the middle size labels one grand nesties from silk board from Clarity stamp, as my back panel with the details of the party on it.
Then I cut 80 of the labels 16 regular nesties out of silk board and stamped it with a custom stamp I had made at Clarity, TOM there is ever so helpful and did you know they can make you a stamp with whatver you want on it and it is not costing an arm and a leg like you woud expect.  Mine said it was Courtenays birthday party blah blah.
Then it took me another 2 days to put each element together.
I layered mask and labels 16 piece on the front using 3d foam tape for decoupaging.  When I was attaching the mask I curled it over the edge of my drawing board to give it a bit of dimension and then I stuck down one side and bent it outward in the centre to make it look more realistic. Then I used sticky strip on the back panel of silk board to fasten it and make sure it was secure.  Finally the job was complete.
I have not been allowed to post any pictures until now as the drama queen has been away on holiday in New York USA. The invitations were not ready to go before she left so I had to wait upon her return to post the pics :o)
I think it is worth the wait though and many people have commented on them since she has been giving them out on how intricate they are and so much glitter etc.
I am a happy mummy and a happy crafter knowing she likes them and the recipients do too!  They can come to the party and still have the invitation as a keepsake too :o)
Now wait for my next posts with the party favours and cake woohoo..........dramatic doesnt even cut it :OP

Panic not, the invitation details you can see here is a 'dummy' invite just so I could take a picture of the back and it looked realistic.  The date and venue are deliberately wrong ;O)
Tuesday, 1 February 2011

OWL you doing?

I had bought a cd from Crafty Catz back in October last year at the SECC hobbys and handicrafts show and well you know how it is, you use it for bits and pieces and never really get the chance to play properly.  So over the Christmas period I got to play a bit more with the cds I own and decided to make some pieces using the owls.  Here is one of them I made for a 40th card.  I sent pics to the designer of the cd and she loved it, so hey Im delighted to say I am now officially a sample maker for Crafty Catz cds and stamps, woohoo or should I say twit twoo!


card for my father in law from the kids

We set out to make a card for my father in law from my kids.  They call him papa which is what he likes so I had to put 'Papa'on the front of the card although I prefer granda or granpa.  They wanted glitter and stickers and shiny shiny bits so my three year old told me but I had to draw the line somewhere.  The card is a compromise between my creativity border and their wishlist.

I used Nestabilities to create the main shape of the card and simply scored them both 1 inch in and glue them together to create the card.  Then I used smaller nesties to create the layers.  The stamp is ELZYBELLS birthday bears and the inside is simply glitter girls peel offs with sparkly stars on them.  Then instead of an insert I simply stamped 'you are a star' inside to create a background instead of a verse.

Quick and simple but the kids and 'papa' loved it. Job Done!

Thursday, 27 January 2011

my roses tutorial

Hi there
A couple of weeks I was asked how I had made the roses for the wedding last summer and I tried to explain the process in a few picture and instructions.
I then was asked if I would show them on a little video and whilst I havent said a word on this I did however take a very short video of my fingers making a quick rose to show you the basics of how it is done.
I posted the video on lets craft on facebook for all my fellow crafting friends to see but here it is in case you fancy trying your hand at making these roses.
Go on you know you want to see if you can do it :o)
They are very simple, after all I made over 3500 for the wedding ;p)

Sunday, 16 January 2011

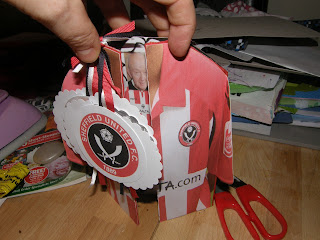
sheffield united birthday card, made by request

I was asked if I could come up with an 80th birthday card for a man who was a serious lifelong Sheffied United supporter.  I thought ok lets give it a go.
I checked out the strip the year he was born and then I found out a bit about the history of the club and found out they had been in the FA Cup Final so I got a picture of that strip too. I made a small tag from the two strips and I got a metre of red white and back ribbons to make the tag hang loose.  Using a copy of the team badge I made a rosette from crepe paper and the printed badge which I cut using a 'huge' circle punch.  I covered a plain white a5 envelop with plaited crepe as well to create a kind of 3d effect too and ayered the rosette and tag onto the envelope adding a small rectangle with silver n red inked edges for the name to be added.


The card itself I cut using the cricut and some 100mic grey board to make it super sturdy to hold plenty of embellishment and to stand up like a footie strip.  I used pics of the recipient and their strips over the years along with club memorabilia and pics of the mascot and team logo etc to make a collage for the inside of the card.


Then I punched 6 scalloped circles and layered somepunched circle photos to make tags that hang down the front of the card for memories of things achieved by the club.


A photo of the recipient, a photo of the FA cup team, a photo of the team the year he was born, and a photo of the team mascot, and one of a classic subbuteo game featuring the Sheffield United team.  I layered the two scalloped circles slightly overlapping and laid the photo circle on the top centre to create an oval embellishment.  I hung all of these on the three ribbons which are team colours and then finally the back was another digital image.

 I took a heart sweetie from a branded name moulded into a heart shape and added the nickname of the team and then the recipients surname and age in a banner on the back.  Digital workshopping is not my thing but I thought id give it a try to save me cutting lots and lots of strips of red and white card to make the strip.
I wasnt completely satisfied but then I made it so Im never happy with anything I make.  However the person who requested the card thought it was 'absolutely brilliant' so that is enough for me.
Job Done another happy card recipient :o)

mural on my daughters wall -she is a big MJ fan and is a dance-aholic!

My daughter asked me if I would consider trying to draw Michael Jackson on her bedroom wall.  I wasnt convinced I was up to the challenge but I thought nothing ventured nothing gained.  I printed off a picture that she liked and took it up to her room.  I gridded the picture into manageable squares and drew similar but obviously larger lightly pencilled squares onto her wall that I could easily rub off when I was ready to paint.
Anyway this is how it turned out, do let me know what you think.

get well soon card - with a comedy slant

This is a comedy slant get well soon card for a friends of my hubby's who recently had a heart attack.
The guy has a sense of humour and appreciates making light of his situation so I went for a pick up truck.


 I printed the image which is only a clip art file three times.  I cut the full pick up  out for the base and then cut the front and back off the other two.  I layered them up and coloured them with promarkers, and drew a little guy in a puddle of oil very sketchily using the promarker fineliner.


It is very simple but it was worth a laugh and it was appreciated so all worth it.
Sometimes it is hard to come up with a male card let alone a male get well soon card so this was just novelty.